Thursday 1 August 2019

How to Reset iPhone X/XR/XS without iCloud password?


How to Reset iPhone X/XR/XS without iCloud password? Reset iPhone X with iTunes

You can use iTunes to reset your iPhone X directly if you have ever synced your iPhone X with iTunes. Please also make sure Find My iPhone on your iPhone X is disabled or you cannot use this method. Please follow the following simple steps.

Step 1. Update your iTunes to the latest version. Connect your iPhone X to the computer.

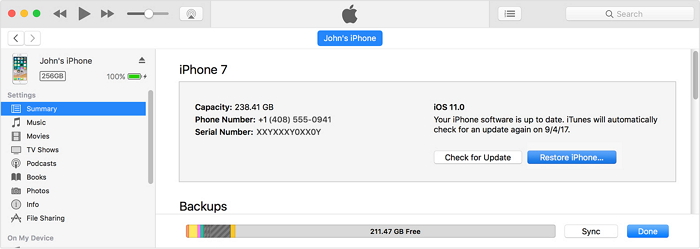
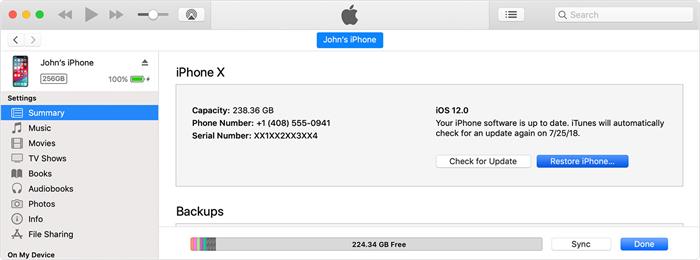
Step 2. After iTunes detected your iPhone X, tap on your iPhone icon.

Step 3. Choose "Restore iPhone" in the Summary tab.


Step 4. Tap on "Restore" again to start the reset.


Step 5. iTunes will reset your iPhone X as a new device.
How to Reset iPhone X/XR/XS without iCloud password? Find Your iCloud Password

You can try to find your iCloud password first, then you can reset your iPhone X normally. Just follow the steps below.
Step 1. Find Your iCloud Password First

There are two ways to change the Apple ID password on iPhone X. You can choose a way based on your situation.

Find iCloud password by iCloud on your iPhone X:


Open the Settings, and click on your name.


Select "Password & Security" on your iPhone X.


Click on the "Change Password" option and enter your iPhone X screen passcode.


Enter a new Apple ID password and confirm it.

Note:

If you have never enabled the Two-factor Authentication on your iPhone X, you cannot use this method to change iCloud password.

Find iCloud password by Apple ID website on a computer:


Go to the Apple ID website.


Click on "Forgot Apple ID or password".


Enter your Apple ID account.


Select your preferred method to reset your iPhone X: Two-factor Authentication, Security Questions or Get an Email.


Follow the on-screen instructions step by step to change your iCloud password.


Note:

You can get the more comprehensive guide to find iCloud password from here.
Step 2. Reset Your iPhone X with New iCloud Password

After you have recovered your Apple ID password, follow the steps below to reset your iPhone X.

Step 1. Launch Settings on your iPhone X.

Step 2. Go to "General", scroll down and tap on "Reset".

Step 3. Choose the "Erase All Content and Settings" option.

Step 4. Enter your new iCloud password to confirm.


If you lost data after you updated to a new iPhone, you can always use Gihosoft iPhone Data Recovery to get the data back from the old iPhone or backup.You may also like: iphonerecovery.com

Sunday 26 May 2019

10 Things You Need to Know about iPhone Keeps Saying Call Failed 2019


Top 10 Methods to Fix iPhone Keeps Saying Call Failed

Now, let’s take a look at the top methods you can consider to this issue.
Method 1. Turn Airplane Mode on & off

Toggling the Airplane Mode on and turning it off once again would solve this issue for most of the users. This can be the easiest of all.

Step 1: Swipe up from any of the screens of the iPhone and access Control Center.

Step 2: Then, tap on the Airplane icon located on the upper-left corner. Just wait for a couple of seconds and turn the same option off.


Method 2. Disable Call Blocking

If you have enabled call blocking feature on your device, you cannot make phone calls (obviously).

Step 1: Go to Settings app and select Phone.

Step 2: Then, tap on Call blocking & Identification. If the app is switched on under “Allow These Apps to Block Calls and Provide Caller ID”, turn it off.


Method 3. Toggle Caller ID on & off

If called ID is on, you can turn it on to see if the problem resolves.

Step 1: You can go to Settings and select Phone.

Step 2: Then, go to Show My Called ID.

Step 3: Then, make sure that the button is green.


Method 4. Change the Date & Time

If the date & time of the device is incorrect, you will have to correct it. Here’s how to do it.

Step 1: Go to Settings and select General option.

Step 2: Then, go to Date and Time.

Step 3: Turn on “Set Automatically”.


Method 5. Restart iPhone

If the problem is still there, you should try a restart on device. In fact, this can be one of the simplest solutions for you to fix various minor issues.

Step 1: Press and hold the Sleep/Wake button of the device and wait for a couple of seconds.

Step 2: The slider will appear now. Just move it from left to right and let it be completely off. Wait for 30 seconds or so.

Step 3: Turn the device back simply by pressing the Sleep/Wake button.


Method 6. Disable LTE

In order to get faster cellular data on your device, you can turn on LTE. Nevertheless, it may affect the call-making ability of the device for some users. To fix it just disable LTE.

Step 1: Go to Settings app and select Cellular.

Step 2: Then, select Cellular Data.

Step 3: Tap on Voice & Data and choose 3G here.


Method 7. Update Carrier Settings

For some users, Updating the Carrier Settings of the iPhone might do the trick. Here’s how to do it.

Step 1: First, make sure that the iPhone is connected to a good internet connection.

Step 2: Open Settings app and select General. Then, go to About option.

Step 3: If there’s an update, you can simply see a notification so you should opt to that.


Method 8. Factory Reset iPhone via iTunes

Factory reset would be the another resort you can have a try, but you will lose all the existing data as a result of this process.

Step 1: Open iTunes on the computer and connect the device to the same computer.

Step 2: Provide the passcode if prompted and select the iPhone from the appearing menu.

Step 3: Click on Restore which is located in the Summery panel.

Step 4: Click on Restore to confirm. iTunes will now erase all the data on your device and install with the latest software. Once the device is restarted, just configure the device as a new one.


Method 9. Dial *#31#

Dialing the code *#31# would be one of the easiest ways to disable the hidden anonymity status.


Method 10. Fix iPhone Keeps Saying Call Failed without Data Loss

As you might realize, some of the methods used to fix the above issue can cause data loss. For instance, factory reset or restoring through iTunes can cause data loss. If you want a method that doesn’t cause data loss, try iMyFone Fixppo.Also Read:Best free Beat making software

Also Read:view private Instagram Profiles

Also Read:Permanently Delete Line Messages and Chat History on iPhone

Also Read:Hack Facebook account online of any user? Full 100% working

Also Read:Top 11 Icon Packs for Android to customize all the icons present 2019


Sponsor ads:

Gihosoft RePicvid Free Photo Recovery Software provides a free photo recovery software for windows to help users recover the deleted or lost photo for free.

If you lost data after you updated to a new iPhone, you can always use Gihosoft iPhone Data Recovery to get the data back from the old iPhone or backup.You may also like: iphonerecovery.com

If you use android phones, please choose Gihosoft Android Data Recovery.With Gihosoft Android Data Recovery, no longer afraid of data loss!

iPhone Manager:Get the ultimate Gihosoft iPhone Manager. Free download for PC/Mac.

Tuesday 5 March 2019

Tips –What to Do before You Sell or Give Away Your Old iPhone


Tips –What to Do before You Sell or Give Away Your Old iPhone

There are somethings you should do before selling your old iPhone; basic things that will make sure you are only selling your iPhone and not a database where people can source for your personal information.


Back up with iTunes or iCloud: If there are some files that is important and useful for you, make sure to do a full back up, that way all your data can be restored whenever you want.


Sign Out from iTunes and App Store : iTunes and App Store keep all your personal data like name, address and most importantly payment information. You don’t want the next owner know any about it and use if for bad purpose. If you don’t have any professional tool help you reset your old iPhone, you should sign out manually to protect your personal privacy.


Reset Personal Data Completely: It’s important to reset your old iPhone completely to make sure your personal data keep safe and no access to wrong hands. Rather than normal reset from settings directly with chance of recovery, it’s better and safer to reset it using a professional tool to ensure everything is gone forever.
Sponsor ads:How to Download & Save Facebook Videos to Camera Roll on iPhone/iPad 2019Sponsor ads:Top 6 Best Vumoo Alternative Sites for You to Watch and Download Movies 2019

Wednesday 20 February 2019

Ways to Sync Photos to iPad Easily


02 Sync Photos to iPad Using iTunes – Erase Previous Photos

iTunes is primary software to sync photos onto iPad. Just because of its tricky user interface people gets irritated but somehow this is another way out.


Install latest version of iTunes in your computer.


Plug In your iPad to your computer via supported USB cable.


Your connected device will be shown in upper left corner, click on it and setting options will appear (Apps, Music, Movies, TV Shows, Podcast, Photos & Info).


Click “Photos” tab from the setting.


Now in the main window of iTunes ‘Sync Photos’ option will appear, check it and click on “Sync” button at the bottom and you are DONE.


Limitations of iTunes:


Please make sure the “iCloud Photos Library” on your iPad is off, or this method is not available for you. Go to “Settings > iCloud > Photos” on your iPad to check it.


The synced photos cannot be deleted from iPad.


03 Sync Photos to iPad Using iCloud Photo Library

You can simply sync photos to iPad via iCloud Photo Library, another way out of your problem.

Step 1: Make sure the “iCloud Photos Library” is enabled on your computer.

Note: On Mac, click “Apple” menu, then “System Preferences” and then “iCloud”. Tick “Photos” in the control panel.

On Windows, install the iCloud and open it. Tick “iCloud Photo Library”.

Or you can go to iCloud.com via the web on your computer to add new photos.

Step 2: Connect your iPad on a Wi-Fi.

Step 3: On iPad go to Settings > iCloud > Photos and switch on iCloud photos library.


Whenever a new photos is added to iCloud on your computer, iPhone or iPad, new photos will be downloaded into all your devices signing into the same account. This may be limits if you want to sync photos just to your iPad but not other devices as well.
04 Sync Photos to iPad Using iCloud Photo Sharing - Only for Mac Users

iCloud photo sharing is a way to sync photos to iPad from iPhoto or Aperture On Mac.


On your iPad, go to “Settings > Photos & Camera”.


Enable “iCloud Photo Library” and iCloud Photo Sharing”.


On your Mac, open iPhoto or Aperture.


Check the photos you want to sync.


Hit “Add To > iCloud”/”Share > iCloud” to create a new shared photo stream.


Name the stream. Add your Apple ID to share.


On your iPad, open “Photos” app and go to “Shared” tap at the bottom.


You can find the photos from iPhoto or Aperture. You can download the photos to your iPad by choosing photos, clicking “Share” button and then “Save Image”. But note that, as the iCloud Photo Library is enabled, the downloaded photos will be added into iCloud Photo Library as well.


Final Thought

Of course, there are more than one way to sync photos to iPad. But not all of them are suitable for you. Some of the ways have limitations, like only suitable for Mac, may occupy storage on other iDevice, etc. But for all users, it is suggested to consider the iPad transfer tool to sync photos to iPad as it does not have any limits.Sponsor ads:

Gihosoft Free iPhone Data Recovery:https://www.gihosoft.com/iphone-data-recovery-free.html

Gihosoft iPhone Data Recovery Free

Free iPhone Data Recovery Software for Windows/Mac

Recover up to 12+ types of files, including contacts, SMS, photos, WhatsApp, Viber, notes, etc.

Restore lost data from iOS devices directly or from iTunes and iCloud backup

Recover iPhone data lost due to iOS upgrade/jailbreak, accidental deletion, device lost or broken

Support all the latest iPhone, iPad and iPod Touch

Both Free and Pro version.

If you lost data after you updated to a new iPhone, you can always use Gihosoft iPhone Data Recovery to get the data back from the old iPhone or backup.You may also like: iphonerecovery.com

If you use android phones, please choose Gihosoft Android Data Recovery.

With Gihosoft Android Data Recovery, no longer afraid of data loss!

Must read:Youtube video downloader for pc

Gihosoft RePicvid Free Photo Recovery Software provides a free photo recovery software for windows to help users recover the deleted or lost photo for free.

Jihosoft Android Data Recovery: the best Android Data Recovery software for Windows and Mac to recover deleted contacts, messages, photos, videos, WhatsApp and etc from Android devices.Tips:How to transfer messages from iPhone to iPhone

jihosoft Free iPhone Data Recovery

Saturday 2 February 2019

How to Fix the iPhone 1970 Bug

How to Fix the iPhone 1970 Bug 2019


In the past few days, there was one hot topic on the social networks. At the very beginning, it might be one joke played by some users: if you set your iPhone time back to January, 1, 1970, your iPhone would be bricked. And then more and more people proved this and discussed it on SNS. Finally, Apple responded with the following words:

Manually changing the date to May 1970 or earlier can prevent your iOS device from turning on after a restart.

So how would that happen? Why is the iPhone 1970 problem and what can users do to fix the problem?

It is said that the 1970 iPhone bug is related to that iOS is Unix based system. And Unix time starts at Jan, 1, 1970, the time after the data is saved as seconds. And for users’ better understanding, the time is converted as needed. As for the time before Jan, 1, 1970? I guess Apple didn’t think their users would have the demand to go back 46 years ago.

So how to fix it in the end? Well, Apple said that they will fix the bug in the coming iOS system update. But I know the majority of affected iPhone users can not wait for so long. Here are two methods to solve this problem.


First, disassemble the bricked iPhone and take out the battery, then reinstall the battery after 10 minutes.

Second, lay aside your fully charged iPhone for several hours. When the numerical values of Unix based system is greater than or equal to zero, the system time will be effective and the iPhone can be restarted.

And finally, there is one kindly advice. Please don’t try this iPhone 1970 bug which seems funny. I know that some of my friends tried this due to curiosity and paid for that finally.Sponsor ads:

Gihosoft Free iPhone Data Recovery:iphonerecovery.com

Free iPhone Data Recovery Software for Windows/Mac

Recover up to 12+ types of files, including contacts, SMS, photos, WhatsApp, Viber, notes, etc.

Restore lost data from iOS devices directly or from iTunes and iCloud backup

Recover iPhone data lost due to iOS upgrade/jailbreak, accidental deletion, device lost or broken

Support all the latest iPhone, iPad and iPod Touch

Both Free and Pro version.

If you lost data after you updated to a new iPhone, you can always use Gihosoft iPhone Data Recovery to get the data back from the old iPhone or backup.

Top 10 Best FRP Bypass Tools to Bypass Google Account on Android Device 2019

Worth reading:download youtube 1080p

Tuesday 29 January 2019

Critical FaceTime bug lets people spy on you – even if you don’t answer


FACETIME “SPY BUG” POSES A MAJOR SECURITY THREAT TO APPLE’S USER BASE

A critical bug in FaceTime allows callers to access another person’s microphone even if they don’t answer the call.

It lets almost anyone without any technical know-how the power to spy on you. Further, a stationary Apple device can easily be monitored for longer periods of time.

This has a lot of ramifications – for example, imagine having a conversation with someone while the eavesdropper calls you and starts listening without you answering the call.

Twitter user “Benji Mobb” was the first to discover this bug. He also uploaded a short 12-second video that shows how the bug works.


Benji Mobb™@BmManski

Now you can answer for yourself on FaceTime even if they don’t answer#Apple explain this..

85.5K

3:24 AM - Jan 29, 2019

35.3K people are talking about this

Twitter Ads info and privacy

Surprisingly, this bug is not limited just to audio, anyone can access your camera if you press the power button to reject the call.

Here’s how the FaceTime “eavesdrop bug” bug works and how you can reproduce it.
HOW THE FACETIME SPY BUG WORKS


Call another FaceTime user and manually add their number as an additional person.


You will now have a conversation with yourself and one other person. That’s it! You can now access the other person’s microphone and spy on their conversations, even if they did not answer the call.


You can also access their camera for a brief period of time when the receiver presses the power and volume buttons to reject the incoming call.

This bug works on all recent iPhone devices and Mac computers, including the iPhone XS/XS Max and XR. As far as compatibility goes, iOS 12.1 and later versions are vulnerable to this bug.
APPLE TAKES FACETIME OFFLINE

Since this bug affects the vast majority of iPhone users, Apple has already taken down the FaceTime service.

According to Apple’s system status webpage, FaceTime is no longer functional and marked with a yellow “Issue” icon.


The FaceTime group calls feature will not return until the developers patch the bug.

Apple will likely push a firmware update that deals with this bug in a couple of days. However, a server-side fix would be a better choice as users will not need to forego their current firmware version and upgrade to iOS 12.2.1.

Sponsor ads:

Gihosoft Free iPhone Data Recovery:iphonerecovery.com

Free iPhone Data Recovery Software for Windows/Mac

Recover up to 12+ types of files, including contacts, SMS, photos, WhatsApp, Viber, notes, etc.

Restore lost data from iOS devices directly or from iTunes and iCloud backup

Recover iPhone data lost due to iOS upgrade/jailbreak, accidental deletion, device lost or broken

Support all the latest iPhone, iPad and iPod Touch

Both Free and Pro version.

If you lost data after you updated to a new iPhone, you can always use Gihosoft iPhone Data Recovery to get the data back from the old iPhone or backup.

Top 10 Best FRP Bypass Tools to Bypass Google Account on Android Device 2019

Worth reading:download youtube 1080p

Jihosoft Android Data Recovery: the best Android Data Recovery software for Windows and Mac to recover deleted contacts, messages, photos, videos, WhatsApp and etc from Android


If you use android phones, please choose Gihosoft Android Data Recovery.

Thursday 24 January 2019

Apple Music for Android Now Supports Tablets


Android is incredibly popular on smartphones. Tablets, however, are a different story.

Still, it’s good when developers support them anyway. And that’s exactly what Apple Music’s developers are doing. Apple updated Apple Music for Android, bringing the version number to 2.7.0. With the update, Apple is fixing the general behind-the-scenes issues, and also improving performance. It still measures in at 43MB to download and install.

The most important part of the update is tablet support. Apple confirmed the change in its changelog for the latest update. Apple says its streaming music platform now supports “a wider range of Android devices, including tablets”. It does not go into any specific details, though. The app’s landing page in the Play Store does say an Android device needs to running Android 4.3 and newer to run the app.

Android tablets aren’t flying off the shelves by any means, but they are certainly out there. It may have been frustrating to those who do have Android tablets and use Apple Music to find the two aren’t compatible. Better late than never on a fix to that particular issue.Must Read:If you lost data after you updated to a new iPhone, you can always use Gihosoft iPhone Data Recovery to get the data back from the old iPhone or backup.

Gihosoft Free iPhone Data Recovery:iphonerecovery.com

You can find a link to download Apple Music for Android below. It’s free to download, but a subscription for an individual starts at $9.99 per month.

Download


Apple Music for Android — Free


Like this post? Share it!

How to Reset iPhone X/XR/XS without iCloud password?

How to Reset iPhone X/XR/XS without iCloud password? Reset iPhone X with iTunes You can use iTunes to reset your iPhone X directly if you ha...