Monday, 19 November 2018

Fix iPhone Stopped Working via iTunes Restore (with Data Loss) 2019

Fix iPhone Stopped Working via iTunes Restore (with Data Loss) 2019


Fix iPhone Stopped Working via iTunes Restore (with Data Loss)

On the other hand, if you’re not willing to go for the third-party method, you can also fix the problem via iTunes restoration. The drawback of the iTunes restoration is that you will lose all your data. Here is how you can do it:

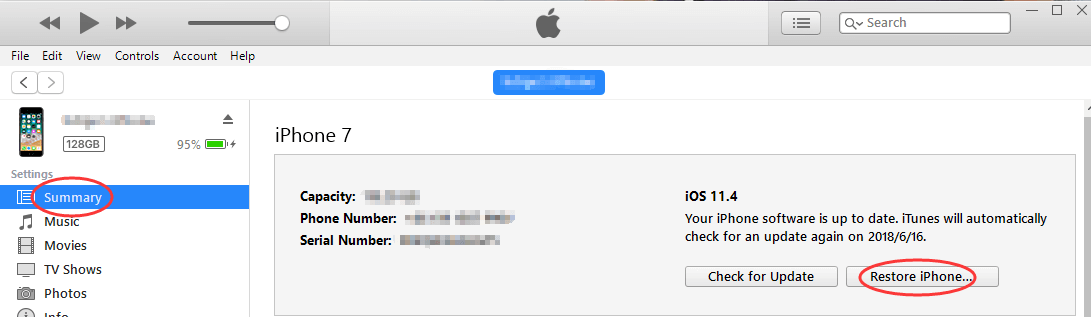
Step 1. Launch iTunes on your Mac or Desktop PC.

Step 2. Attach the iPhone with the desktop using a cable and enter the password.

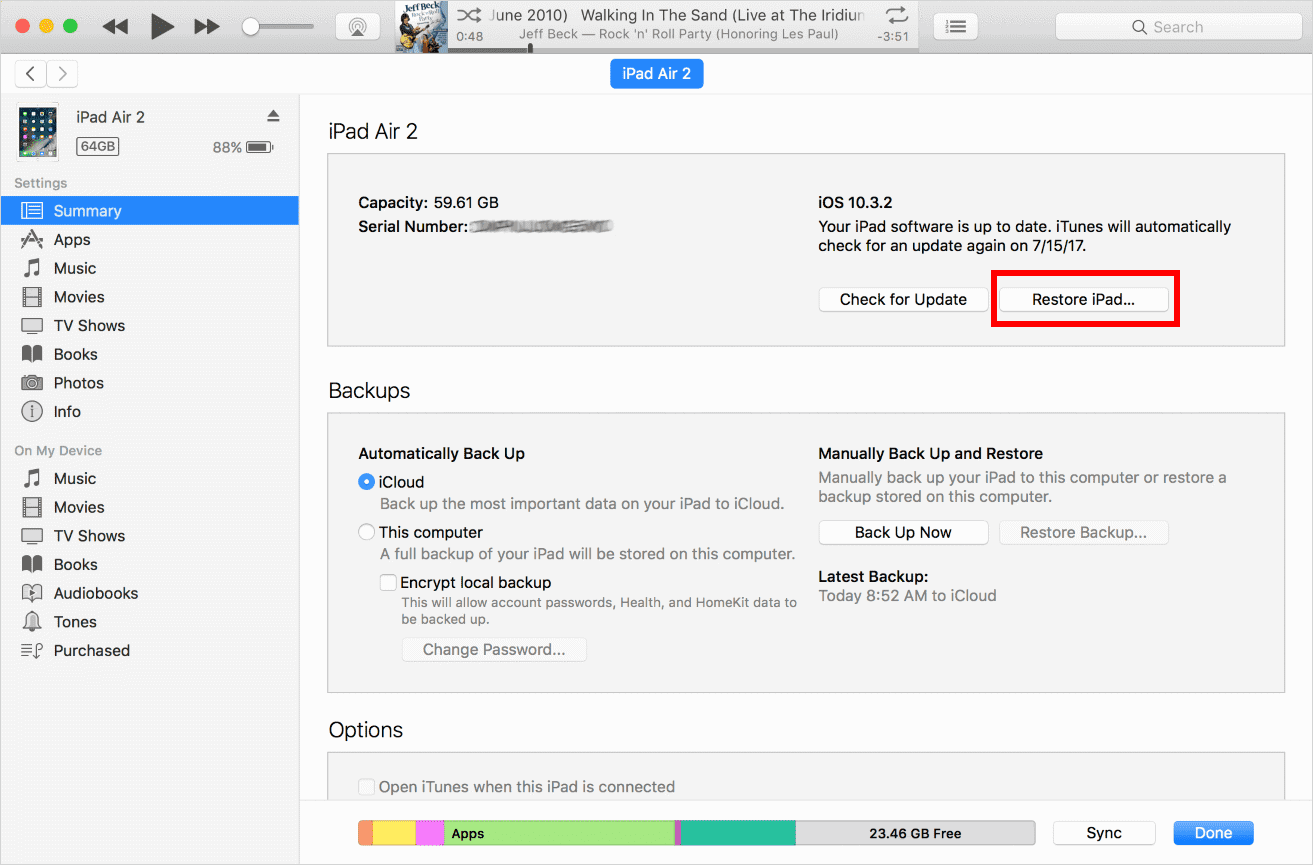
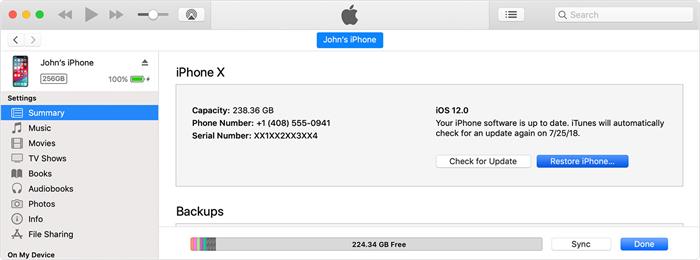
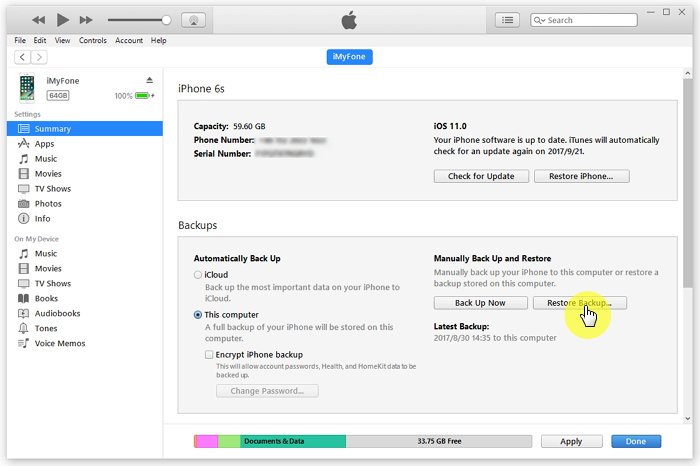
Step 3. Select your iPhone device and click “Restore Backup”.

Step 4. Determine the date, size, and type of the backup and select the most useful backup.

Step 5. Click “Restore” and complete the process.


1.2 Fix iPhone Stopped Working via iCloud Restore (with Data Loss)

Similarly, the drawback of iCloud restoration is that you will lose all data. First, you have to restore your iPhone as a new one.

Step 1. Open “Settings” and go to “General”. Scroll down and tap “Reset”.

Step 2. Tap “Reset all Content and Settings” and enter the encryption details to complete the process.

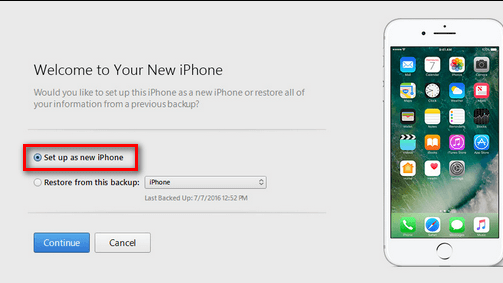
Step 3. After this, the iPhone will be restarted. When the iPhone turn on after restoration, you will see a Hello screen. Complete the setup and click “Restore from iCloud Backup” at the App & Data page.

Step 4. Now sign into your iCloud account with Apple ID. Choose the most useful backup from the list and restore the device.

Sponsor ads:

Gihosoft Free iPhone Data Recovery:https://www.gihosoft.com/iphone-data-recovery-free.html

Gihosoft iPhone Data Recovery Free

Free iPhone Data Recovery Software for Windows/Mac

Recover up to 12+ types of files, including contacts, SMS, photos, WhatsApp, Viber, notes, etc.

Restore lost data from iOS devices directly or from iTunes and iCloud backup

Recover iPhone data lost due to iOS upgrade/jailbreak, accidental deletion, device lost or broken

Support all the latest iPhone, iPad and iPod Touch

Both Free and Pro version.

If you lost data after you updated to a new iPhone, you can always use Gihosoft iPhone Data Recovery to get the data back from the old iPhone or backup.You may also like: iphonerecovery.com

If you use android phones, please choose Gihosoft Android Data Recovery.

With Gihosoft Android Data Recovery, no longer afraid of data loss!


Note that the iCloud restoration can take a few minutes depending upon the backup file size.

Thursday, 25 October 2018

How to Erase iPhone from iTunes 2019


How to Erase iPhone from iTunes 2019

Erase iPhone from iTunes

iPhone users who are certainly dependent on iTunes have a way of removing their device from iTunes very easily without stress. There are several reasons why you would want to erase iPhone from iTunes, some of them include: a) change of mobile device; b) privacy concerns.

Steps on how to erase iPhone from iTunes:

Step 1: Use an original cable to connect your iPhone to the computer.

Step 2: Open iTunes. Select the iPhone tab on the above of the iTunes.

Step 3: Go to Summary. Select the “Restore iPhone”.


Step 4: Click “Restore”. After it finished, you can click “Set up as a new iPhone” to start set up your iPhone.


Step 5: After that, you have erased iPhone from iTunes successfully.

If you lost data after you updated to a new iPhone, you can always use Gihosoft iPhone Data Recovery to get the data back from the old iPhone or backup.

Must Read:Jihosoft iTunes Backup Unlocker

You may also like:online youtube downloader

Tuesday, 9 October 2018

How to Manually Delete Viber Message History iPhone


1. Manually Delete Viber Message History iPhone (Recoverable)

Here is how to delete your Viber messages manually. This is not recommended if you’re concerned about your privacy, since the data would be potentially recoverable:
1.1 Delete the Whole Message History Viber

Step 1. Tap on the Viber icon to open the app on your iPhone.

Step 2. You should see a list of contacts with their message history. Simply swipe left to delete the entire chat thread with that person.
1.2 Delete Specific Messages from Viber

Deleting specific messages just delete the individual messages but keeps the chat.


Step 1. Open Viber app on your iPhone.

Step 2. Tap on a contact to see your message history.

Step 3. Choose which specific message you want to delete. Long-press it until an options bubble comes up. The options should be, Copy, Forward, and Delete. Tap Delete to remove the message.
The “Delete for Everyone” Option

If you sent an embarrassing message on Viber and want to delete it for everyone—not just yourself—so that no one can ever read it again, you can now do so with Viber. This option is only available for messages that you sent yourself, naturally.

Just long-press the message you want to delete in the chat history, and there should be an option that says “Delete for Everyone.” Choose that option to delete the message on everyone’s phones. It works both for two-way conversations and group conversations.


DO NOT FORGET: Back up Viber Messages on iPhone Beforehand!

In order to prevent accidental deletion of important Viber messages, you can keep a backup record of them in advance. Like other messaging applications, Viber itself provides the ability to save your message history. In the future, you can restore the data from the backup anytime and anywhere you like. In addition, Viber only provides this feature for iPhone and Android phone users.

Here are the steps to back up your Viber message history on iPhone:

step 1. Run Viber app on your iPhone.

Step 2. Click on "More" option that shows like the horizontal ellipsis in the lower right corner.

Step 3. Choose the options of "Settings" and then "Calls and Messages."

Step 4. Tap on "Email Message History".


After completing the above steps, your Viber message history will be automatically sent to your configured email ID.

Gihosoft Photo Eraser Erase unwanted objects and perfect your amazing photos!

If you lost data after you updated to a new iPhone, you can always use Gihosoft iPhone Data Recovery to get the data back from the old iPhone or backup.

Jihosoft Photo Eraser

Free iTunes/iPhone Backup Extractor for iPhone, iPad

iPhone Backup Extractor - Extract Data from iPhone Backup

You may also like:online youtube downloader

Friday, 31 August 2018

[Fixed] iPhone Glitch?

[Fixed] iPhone Glitch?
Part 1: Find Your iPhone Glitch Situations Here

The most common type of glitch you may have to deal with is the iPhone screen glitch. This glitch makes it impossible for you to scroll the device. As you scroll down, the iPhone will glitch as if someone is trying to scroll in the opposite direction. Also, if there are buttons on your screen, these will get pressed even though you are not pressing them yourself, like the iPhone may click links available on a webpage itself.


When you are using applications, you will find that your iPhone is closing them automatically when you are in the middle of doing a task with the applications. While you are texting, you may find your iPhone switching between vertical and horizontal views while the replies you were typing are left beneath the iPhone keyboard. When typing emails or texts, you may find that letters get auto-pressed and hence messing up your message.
Part 2: What You Should Do before Fixing iPhone Glitch

You will agree with us that the above situations are all extremely annoying. If you are involved in any of them, you may want to fix it. However, before we show you how to fix iPhone glitch, there is one crucial thing you need to do - backing up your iPhone first.

During the fixing process, it is possible to lose your iPhone data. You wouldn’t want to lose important data such as your contacts, WhatsApp, messages, photos, and more. If you have already created a backup for your iPhone, you can easily restore the iPhone data if the data gets lost during the fixing process.
Part 3: How to Fix iPhone Glitch

After backing up your iPhone, it is time to learn how to fix iPhone glitch. Try the following solutions to fix the iPhone screen glitch.
Solution 1: Update iOS Devices to the Latest Version

Your current operating system could have a bug that is causing the glitch. To fix the iPhone glitch, you can try updating the iOS version. The following steps should help you update the device:

Step 1: Launch Settings -> tap General -> click Software Update. Make sure your iPhone is connected to Wi-Fi.

Step 2: If an iOS Update is available, your iPhone should display it. Click Download and Install. Wait for the update to complete.


You may also like:Gihosoft Mobile Transfer: 1 Click Data Transfer from Phone to Phone

Gihosoft Android data recovery Free is a super awesome software specialized in Android file recovery. With this program, you are able to recover deleted photos, music, videos, messages, contacts, call logs, WhatsApp messages, Viber chat history and more from Samsung, Huawei, LG, HTC, Motorola, Google, Oneplus, Sony, Lenovo, ZTE and other Android devices directly. Meanwhile, this Android data recovery software is available for both Windows and Mac platforms.For now, check:Free iTunes/iPhone Backup Extractor for iPhone, iPad

Jihosoft iTunes Backup Extractor free is a powerful tool to recover and extract important data from iPhone, iPad & iPod touch backup on Windows or Mac.

If you can’t sync with iTunes and want to rescue data from a disable iPhone, you could try Gihosoft iPhone Data Recovery. Also feel free to ask questions on the iDevice is disabled error in the comments section below.


Saturday, 25 August 2018

Top 10 Mac Torrent Sites to Download & Stream Torrents 2019


Top 10 Mac Torrent Sites to Download & Stream Torrents 2019


No matter what the regulations torrent sites are facing, the number of users are constantly booming. Everyone seems to be using torrent sites for various reasons. As a reaction, torrent sites are also increasing to ‘cater’ to this increasing number. So, there are plenty of options still available for Mac users and you can benefit from each one of them. But not every website is good enough, right? Well, you don’t need to sweat all day in search of a good torrent site, because we have just done it for you. Here you go, enjoy.
1. Apple Torrent


You ever used the Mac App Store? Of course, you have. But you ever used the second Mac App Store? AppleTorrent is the second one. It has got all the games you love and also the apps. Their collection is great. They are working hard to become the best and I’d say they are doing great so far.


Website: https://apple-torrent.is
2. Mac Torrents


Mac gamers will probably familiar with this site. It’s famous for its separate tab for all the games that are available on Mac. There are some pretty nifty features this site offers which can be fully used once you make an account on it. There’s also an FAQ (Frequently Asked Questions) portion in case you feel lost on the site.


Website: http://mac-torrents.com
3. 7 Tor


This site is for movie lovers. All those people who love movies, seasons, documentaries and stuff like that; this site is for you. This site offers you a unique and diverse video category where you can choose between theatre, foreign movies, Hollywood and seasons etc.


Website: http://7tor.org
4. Torrent4all


Want to watch that movie of your favourite actor but can’t remember its name? Torrent4all has this sorted out for you. You can search movies by actors and find the ones they have starred in. Plus they have a wide variety of movie stuff, so you are most likely to find the movie you were looking for.


Website: https://torrent4all.com
5. Arena BG


This torrent site is going to be loved by non-native English speaking people who love English movies. It has a vast range of movies as well as seasons plus it provides dual audio with them. In this way, people can watch English masterpieces in their preferred dubbed audios.


Website: https://arenabg.com
6. Rutracker


This site offers a vast number of torrents. Before downloading, it shows you what files and contents a torrent link contains. In this way, you can have a peek into what you are going to download into your Mac and be sure that whether it’s legitimate or not.


Website: https://rutracker.org
7. Katcr


Another torrent search engine and database which is not all about just movies, seasons and documentaries etc. It also has a huge number of games for Mac which for you to explore.


Website: https://katcr.co


Must Read:tumblr video downloader


Must Read:Jihosoft iTunes Backup Unlocker


You may also like:online youtube downloader
8. Extra Torrents


ExtraTorrents is one of the largest torrents website. It offers a big amount of movie, apps, software for Windows and a special section with Mac torrents.


Website: https://extratorrent.ag
9. Pirateiro


Another site which offers a very refined and specific search for torrents so you can get what you are looking for in less time. It offers categories to choose from; like films, TV movies and shows, web series and others.


Website: https://pirateiro.com
10. Piratebay 3


Do you know about the famous Piratebay? Piratebay 3 is its twin brother. It goes ahead in refining your search by adding the “audio” category in the searches, allowing you to search for audio content like songs and podcasts. And not to mention, it also has the regular categories for your searching activities.


Website: https://thepiratebay3.org


Which is your favorite Mac torrent site? Please answer in the comments below.

How to Fix Common iTunes Problems A Step-Wise Guide 2019


How to Fix Common iTunes Problems
Common iTunes Problems and Ways to Fix


Now, we are going to discuss some iTunes not working problems and share ways to solve them. Pay attention closely to each solution as they will help you to solve the problem if you have one.
Problem 1: Cannot Install or Update iTunes for Windows


You might face problem installing iTunes if you have installed it previously. You might be prompted to repair the software. The solution is simple. Follow the steps below to install and update easily.


Step 1.Go to Window Control Panel and click on Uninstall a Program.


Step 2.Tap on Apple Software Update and select Repair from the drop-down menu.


Step 3.There will be on-screen prompts. Follow all to complete the repair process.


Step 4.Once done with the repair process, restart Windows Software Update.


Step 5.Proceed to install iTunes.


Problem 2: iPhone/iPad/iPod Not Recognized by iTunes


Sometimes, you may face iPhone/iPad/iPod unrecognizable problem. It is nothing new, and it can be solved just by carrying out specific checks. If iTunes does not recognize your device, apply any of the suggestions below.


Suggestion 1.Check to see if you have the latest version of iTunes and if the program is compatible with your computer.


Suggestion 2.Make sure you have the latest software on your computer so that your iPhone can work well with your computer.


Suggestion 3.Check to see if the device is turned on.


Suggestion 4.If you see a “Trust this Computer” notification, unlock your iPhone/iPad/iPod and click Trust.


Suggestion 5.Check your USB cable to see if it is damaged.


Suggestion 6.Try to restart your iPhone/iPad/iPod.


Suggestion 7.Connect your device to a different computer.


Suggestion 8.Do not connect your device to computer through an external USB port, but an inbuilt one.
Problem 3: Unexpected Quit or Launch Issue in iTunes


Every iTunes user will experience this iTunes not working problem at one time or the other. But, what can be done to this? Follow any of the suggestions below.


Suggestion 1.Try to restart iTunes.


Suggestion 2.Sign out from your iTunes account and try again.


Suggestion 3.Re-launch iTunes and sign in again. iTunes may work after this.


Suggestion 4.Uninstall iTunes and then reinstall it on your PC.


Suggestion 5.Update your iTunes to the latest version.


Suggestion 6.Restore iTunes to the previous version. It will work without quitting, and you can later download the latest version.Jihosoft Giveaway Alert:


iPhone Backup Extractor - Extract Data from iPhone Backup


The best iPhone Backup Extractor Free software to extract photos, text messages, contacts, voice memos, note, WhatsApp, Viber and etc from iPhone/iPad backup.


You may also like:Gihosoft iPhone Data Recovery


Must Read:Jihosoft iTunes Backup Unlocker
Problem 4: Cannot Import iTunes Playlists


Every iTunes user will experience this problem at one time or the other. But, what can be done to this? Follow any of the suggestions below.


Step 1.Open iTunes and select a playlist.


Step 2.Go to File and click on Library, then click Export Playlist.


Step 3.Export the playlist in .m3u file.


Step 4.Drag and drop the m3u file to where you want to import iTunes playlist.


Problem 5: Cannot See Apple Music File


Make sure you have subscribed Apple Music. Still, if you continue experiencing this iTunes not working issue. Why not try some suggestions below?


Suggestion 1.Check if you have turned on iCloud Music Library.


Suggestion 2.Check if you log in with the same Apple ID that you use to subscribe Apple Music.


Suggestion 3.Check if you have the latest iTunes on your computer.


Must Read:tumblr video downloader


Must Read:Jihosoft iTunes Backup Unlocker


You may also like:online youtube downloader

Friday, 17 August 2018

How to Bypass “iPad is disabled connect to iTunes” – iOS 12 Supported


#2 Fix Disabled iPad - Restore with iTunes Backup


This solution will use an already synced backup from iTunes to restore your device. Here is how it works.


Step 1. Connect your iPad to a computer on which you use iTunes in routine.


Step 2. It will automatically start syncing the device.


Step 3. Now, wait for the backup and sync completion. After the completion, click on Restore iPad.


Step 4. Then iOS Setup Assistant will ask to set up your device, choose Restore from iTunes backup.


Step 5. Select your iPad and choose the most recent backup of your iPad.


Step 6. Now your disabled iPad will be restored.
#3 Fix Disabled iPad - Erase with iCloud "Find My iPhone"


Another working method to restore your iPad is using iCloud. This option is usually used when your iPad is stolen or lost so that no one would use your private data. However, if you are not able to restore your iPad using any method, try this one.


Step 1. Go to the authentic website of iCloud and click on Find my iPhone.


Step 2. Then choose your iPad from device list.


Step 3. Now click on Erase iPad.


Step 4. This will erase the data on your iPad.
#4 Fix Disabled iPad - Restore in Recovery Mode


If you have never synced your iPad with iTunes, you can restore it with recovery mode. With this method, all the data will be erased. Here is how you can do this job.


Step 1. Turn off your iPad and connect your device to USB cable while holding the Home button.


Step 2. While pressing the Home button, you will see Connect to iTunes screen.


Step 3. Then click OK and restore your iPad.


Step 3. Now click on Set up your device and choose iCloud backup to restore your iPad.

If you can’t sync with iTunes and want to rescue data from a disable iPhone, you could try Gihosoft iPhone Data Recovery. Also feel free to ask questions on the iDevice is disabled error in the comments section below.

You may also like:


How to Rescue iPhone Photos and Videos When Stuck in Recovery Mode


How to Get iMessage on Windows PC


4 Easy Ways to Transfer Photos from iPhone to Computer


Sponsor Ads:Jihosoft Android Data Recovery: the best Android Data Recovery software for Windows and Mac to recover deleted contacts, messages, photos, videos, WhatsApp and etc from Android devices.

How to Reset iPhone X/XR/XS without iCloud password?

How to Reset iPhone X/XR/XS without iCloud password? Reset iPhone X with iTunes You can use iTunes to reset your iPhone X directly if you ha...